Making Custom Maps
This guide will teach you how to make custom maps for Kronifer's Map Manager. We will generate realistic demand data using rslurry's Demand Data Generator and then properly format our working directory to prepare it for the Map Manager.
The Demand Data Generator ONLY works for US cities. If you are making a non-US city, you will need to find a way to generate and format the data correctly so that it works in Subway Builder. That will not be covered in this wiki, as it differs from country to country and is a complex task. This is because data is not always readily available for every country.
Before you begin, there are a few things that you should familiarize yourself with. We will be using these tools and resources throughout the guide.
- Git
- node.js
- Knowledge of your operating system's terminal
- Understanding of JavaScript and JavaScript syntax
- For Windows: WSL
Step 1 - Installing the Map Patcher
The old version of Kronifer's Map Manager included a map patcher GUI that can still help us generate our data. Run the following command to clone the map patcher.
git clone -b legacy https://github.com/Subway-Builder-Modded/subwaybuilder-patcher
Now, we have a copy of the legacy map patcher installed. From here, look for the install script. Run the script. On Windows, this script is Install dependencies.bat. On MacOS and Linux, this script is Install dependencies.sh.
Step 2 - Generating Data
Start the GUI. On Windows, this is Start_GUI.bat. On MacOS and Linux, this is Start_GUI.sh. Once that is running, a GUI will open in your browser. This GUI has everything we need to run the map patcher.
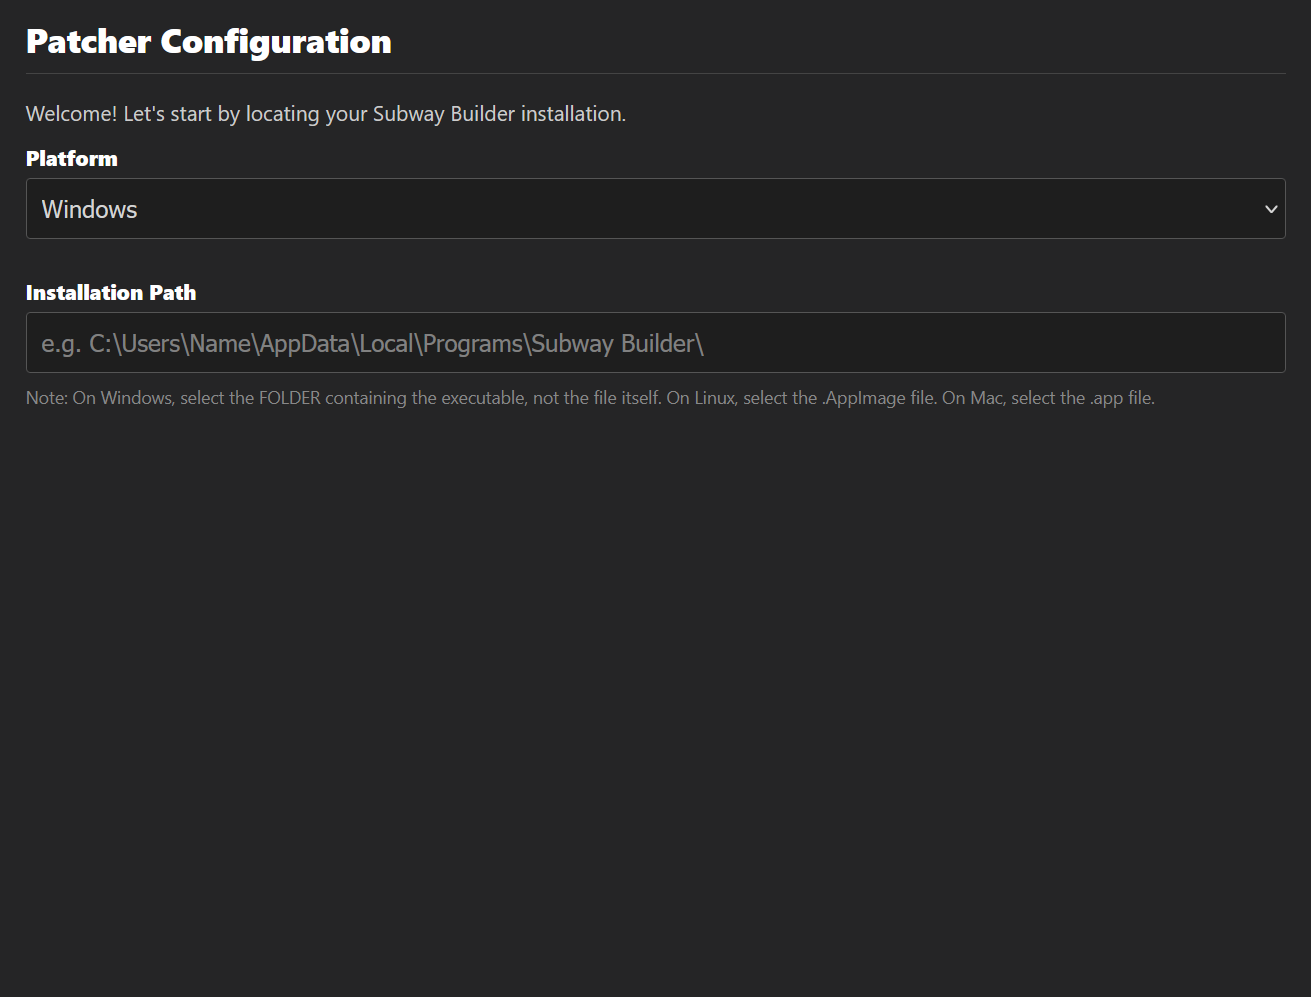
Upon opening the patcher, you will be prompted to select your Subway Builder install location. Note that it does not matter what you put here, as we are not actually going to be patching the game. On the next screen, make sure "Map Patcher (Kronifer)" is selected. There should not be anything else selected.
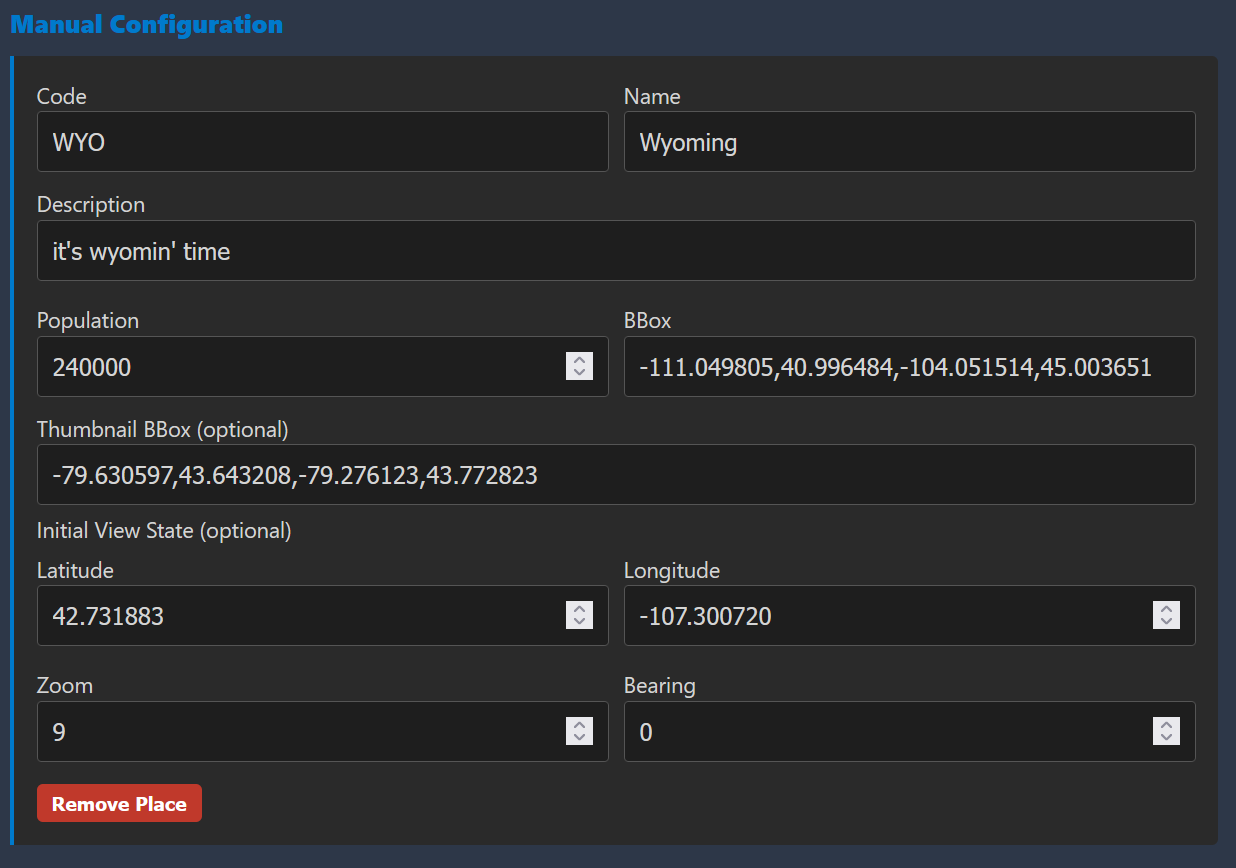
Once you're in the map patcher configuration, click on the tab that says "Manual Configuration". This is where we will enter our fields to generate our data.
- "Code": The 2 to 4 letter city code for your map. It is strongly encouraged to use IATA or ICAO codes, but another code may be used so long as it doesn't clash with another city's IATA or ICAO code.
If your city code clashes with a vanilla city's code, your map may not load in th Map Manager. You can check a list of existing vanilla city codes in metro-maker4/cities/latest-cities.yml.
- "Name": The name of your city. This is what will show up in the Map Manager and in game when you load your map.
- "Description": A short description of your city. This will appear in game.
- "Population": The population of your city.
note
If you are using Google, make sure to note that the population number should only include people who are employed in the region, not the total population.
- "BBox": the coordinates of the bounding box for your city. This should be in the format
[minLon, minLat, maxLon, maxLat]. - "Initial View State": the initial view state that all players will see when they load your map. For
zoomandbearing, the default values will work fine.
Once you have this data inputted, click "Next" and then click "Back". On the previous screen, simply clicking "Run Full Map Setup" without this step will not save the config and may generate data for a different map.
After that, you can click "Run Full Map Setup". This will generate the data for your map. Once the data is finished generating, you can find the output at subwaybuilder-patcher/patcher/packages/mapPatcher/processed_data. We will use buildings_index.json, roads.geojson, and runways_taxiways.geojson. You can ignore demand_data.json as we will be generating our own demand data in the next step. In subwaybuilder-patcher/patcher/packages/mapPatcher/map_tiles, you can find the XXX.pmtiles file, where XXX is your city code. We will need this file later. In It is now safe to close out of the patcher.
Do not run through the rest of the patcher setup. This is a legacy patcher and is no longer a supported method of modifying your game. We are only using this GUI to make it easier to generate our data.
Step 3 - Generating Demand Data
- Windows
- MacOS
- Linux
From this point on, anything done in the "terminal" will be done via WSL. The Demand Data Generator does not support windows, so we will need to use WSL to use the Linux version. Any files downloaded from this point on unless otherwise specified should be the Linux version.
Head to https://github.com/rslurry/subwaybuilder-US-demand-data/releases and download the latest release that corresponds to your operating system. Create a temporary working directory to store our files for now and place this in there. Run the commands (replacing <YOUR_BINARY_FILE> with the name of your binary file where necessary):
chmod +x <YOUR_BINARY_FILE>.bin
From here, it's time to set up our demand generator configuration. Create a file called <YOUR_CITY>.json, where your city is the name of your city (the filename does not matter, but this will make it easier later). Some parameters are optional, includung airport required locations and pop sizes, some parameters for universities, and all entertainment-related parameters.
In this file, include the following parameters:
    city : string, the city you're modeling.
           Example: "Rochester"
    airport : list of strings, IATA codes for the local airport
                               Note: The first listed airport is used here to uniquely identify a city.
              Example: ["ROC"]
    states : string or list of strings, two-letter code for the state(s) your map covers.
            Example: "ny"
            Example: ["md", "dc", "va"]
    year : int, the year you want to use for the LODES data.  At the time of writing, it must be within 2002-2023.
           Example: 2022
    bbox : list of ints, the [min_lon, min_lat, max_lon, max_lat] boundary for the city.
           Example: [-77.8216, 43.0089, -77.399, 43.3117],
    cbd_bbox : list of ints, exactly like `bbox` except for the Central Business District.
                             Can be used to reduce clustering for the downtown area.
                             To disable, set this to null.
               Example: null

    HUMAN_READABLE : (optional) bool, determines whether to make the output demand_data.json file have indentation
                                      structure for readability (true) or not to minimize file size (false).
                      Default: false
    MAX_WORKERS : (optional) int, sets the number of workers to use for parallel processing.
                   Default: None (total number of CPU threads)
    MAXPOPSIZE : int, maximum size any pop can be.
                      Pops larger than this value are split into multiple pops to follow this setting.
                 Example: 200
    CALCULATE_ROUTES : bool, determines whether to calculate commuting routes.
                             Recommended to set this to false when initially testing out boundaries and clustering.
                             NOTE: It can take a long time to calculate routes!  Small cities are 15-30 minutes
                                   on a 16 core machine, which means ~1-2 hours on a 4 core machine!
                       Example: true
    SMALL_THRESHOLD : int, maximum pop size considered for agglomerative clustering.
                           Pops smaller than this size will be merged with other nearby pops that work at the
                           same location.
                      Example: 100
    DISTANCE_THRESHOLD_NONCBD : float, distance threshold in degrees to consider when clustering.
                                       This is applied outside the CBD, or if the CBD is not used, then applied
                                       everywhere.
                                       Note that you will get demand points separated by less than this value,
                                       so do not use this value as a "minimum separation" parameter.
                                Example: 0.1
    DISTANCE_THRESHOLD_CBD : float, like `DISTANCE_THRESHOLD_NONCBD` but applied within the CBD defined by
                                    `cbd_bbox`.
                             Example: 0.05
    DEMAND_FACTOR: float, multiply all LODES pop sizes by this factor.
                          This parameter is only offered to make cities with small number of commutes viable.
                          In general it is recommended to use a value of 1.
                          Example: 2

    point_locs_to_move : list of list of floats, coordinates in [lon, lat] of demand points that you want to move
                                                 for whatever reason (over water, overlapping, etc.).
                                                 Must correspond exactly to the order used in `moved_point_locs`.
                                                 To not use this, set it to []
                         Example: [[-77.69260, 43.29925], [-77.69280, 43.28780], [-77.74163, 43.30533],
                                   [-77.76616, 43.29830], [-77.75377, 43.29501], [-77.73190, 43.29221],
                                   [-77.71047, 43.28571], [-77.53833, 43.22158]]
    moved_point_locs : list of list of floats, coordinates in [lon, lat] where you want to move the
                                               demand points to.
                                               Must correspond exactly to the order used in `point_locs_to_move`.
                       Example: [[-77.69253, 43.29669], [-77.69224, 43.28529], [-77.73431, 43.30351],
                                 [-77.76969, 43.29365], [-77.75209, 43.29262], [-77.72819, 43.29165],
                                 [-77.71078, 43.28141], [-77.54152, 43.22132]]

    airport_daily_passengers : (optional) list of ints, number of daily passengers at the city's airports.
                               Example: [7000]
    airport_loc : list of list of floats, coordinates in [lon, lat] of the city's airports.
                  Example: [[-77.67166, 43.12919]]
    airport_required_locs : list of list of list of floats, coordinates in [lon, lat] where you want airports'
                                                    travelers to reside.  One pop will be placed at the
                                                    demand bubble closest to each specified coordinate.
                                                    If you don't care to set this, then use [] and the code
                                                    will decide automatically.
                            Example: [[[-77.61298,  43.15729], [-77.60688,  43.15614], [-77.58936,  43.1547 ],
                                       [-77.59342,  43.15564], [-77.6741 ,  43.21029], [-77.61647,  43.10564],
                                       [-77.61391,  43.08771], [-77.55086,  43.11299], [-77.57981,  43.19774],
                                       [-77.4567 ,  43.2146 ], [-77.44227,  43.21617], [-77.68496,  43.18599],
                                       [-77.64286,  43.0601 ], [-77.65179,  43.05802], [-77.44922,  43.01093],
                                       [-77.51514,  43.09333]]]
    air_pop_size_req : list of ints, size of airports' pops assigned by `airport_required_locs`.
                            Note that if this exceeds `MAXPOPSIZE` then each pop will be split into multiple
                            smaller pops.
                       Example: [200]
    air_pop_size_remain : list of ints, size of airports' pops assigned automatically by the code.
                              Note that if this exceeds `MAXPOPSIZE` then each pop will be split into multiple
                              smaller pops.
                          Example: [150]

    universities : list of strings, 2-4 letter identifier for each university considered.
                                    All subsequent university-related parameters must correspond exactly to
                                    this ordering.
                   Example: ["UR", "RIT", "SJF", "NU", "RWU"],
    univ_loc : list of list of floats, coordinates for each university's demand bubble.
               Example: [[-77.62668, 43.12989], [-77.67629, 43.08389], [-77.51239, 43.11575],
                         [-77.51873, 43.10218], [-77.79857, 43.12568]]
    univ_merge_within : list of ints, distance in meters to merge any nearby demand points into the new university
                                      demand point.
                   Example: [0, 350, 300, 0, 0]
    students : list of ints, number of students that attend each campus.
               Example: [11946, 17166, 4000, 2500, 1500]
    perc_oncampus : list of floats, percentage of students that live in on-campus housing for each university.
                    Example: [0.45, 0.4, 0.33, 0.5, 0.6]
    univ_pop_size : list of ints, size of each pop created for each university.
                    Example: [75, 75, 75, 75, 75]
    univ_perc_travel : list of list of floats, fraction of students that live [on campus, off campus] that travel
                                               on an average day.
                                Default: [0.3, 0.5]

    entertainment : list of strings, short identifiers for each entertainment location
    ent_loc : list of list of floats, coordinates in [lon, lat] for each entertainment location
    ent_req_residences : list of list of list of floats, like `airport_required_locs` but for
                                                         entertainment locations
    ent_size : list of ints, number of daily visitors to each entertainment location
    ent_pop_size : list of ints, size of each pop created for each entertainment location
Once you set that up, run:
./<YOUR_BINARY_FILE>.bin <YOUR_CITY>.json
You may need to include a MAX_WORKERS parameter in your config file to prevent the program from using too many resources. If you encounter issues with the script crashing, set MAX_WORKERS to a lower number. The higher the number, the faster the script will run, but it will use more resources.
This can take anywhere from an hour to a few days depending on your computer's specs, the size of the map, and the MAX_WORKERS value set in the config.
This process will yield a demand_data.json in demand_data/<YOUR_CITY>/. This is the final data file we need to finish making your map.
Step 4 - Creating the Config File
To proceed with this step, we need a total of 5 files:
demand_data.json(generated with the Demand Data Generator)buildings_index.json(generated with the map patcher)roads.geojson(generated with the map patcher)runways_taxiways.geojson(generated with the map patcher)XXX.pmtiles(generated with the map patcher;XXXis your city code)
In your temporary working directory, create a file called config.json. This file will contain our configuration for the Map Manager. Inside, you can place this template:
{
  "name": "Wyoming",
  "code": "WYO",
  "description": "it's wyomin' time",
  "population": 240000,
  "initialViewState": {
    "zoom": 12,
    "latitude": 42.731833,
    "longitude": -107.30072,
    "bearing": 0
  },
  "creator": "muffintime",
  "version": "1.0.0"
}
For more optional features that can be included in config.json, check the optional features page.
Edit this to suit your needs. Note that creator and version can be any arbitrary values.
The name, code, description, population, and initialViewState should all match exactly what you put in the map patcher. If you do not copy them exactly, this could cause problems for players down the line.
Step 5 - Packaging the Map
- Windows
- MacOS
- Linux
Now, we should have a total of 6 files (the 5 mentioned above and the config.json we just created). It's time to package them into ZIP format to be able to distribute our map to users.
Open a terminal and navigate to the directory in which all 6 files are located. Install the zip package if you haven't already. You can do so by running:
sudo apt install zip
This will let us create a ZIP file from the command line. Run the following command (replace MAP_NAME.zip and XXX.pmtiles accordingly):
zip MAP_NAME.zip demand_data.json buildings_index.json roads.geojson runways_taxiways.geojson XXX.pmtiles config.json
If you'd like, you can manually make the ZIP however you want. However, ensure that your files are in the root of the ZIP, not nested inside of a subfolder. The correct format should be:
- MAP_NAME.zip
--- demand_data.json
--- building_index.json
--- roads.geojson
--- runways_taxiways.geojson
--- config.json
--- XXX.pmtiles
and NOT:
- MAP_NAME.zip
--- subfolder
----- demand_data.json
----- building_index.json
----- roads.geojson
----- runways_taxiways.geojson
----- config.json
----- XXX.pmtiles
Now, we should have a total of 6 files (the 5 mentioned above and the config.json we just created). It's time to package them into ZIP format to be able to distribute our map to users.
Open a terminal and navigate to the directory in which all 6 files are located. We can now create a ZIP file from the command line. Run the following command (replace MAP_NAME.zip and XXX.pmtiles accordingly):
zip MAP_NAME.zip demand_data.json buildings_index.json roads.geojson runways_taxiways.geojson XXX.pmtiles config.json
If you'd like, you can manually make the ZIP any way you'd like. However, ensure that your files are in the root of the ZIP, not nested inside of a subfolder. The correct format should be:
- MAP_NAME.zip
--- demand_data.json
--- building_index.json
--- roads.geojson
--- runways_taxiways.geojson
--- config.json
--- XXX.pmtiles
and NOT:
- MAP_NAME.zip
--- subfolder
----- demand_data.json
----- building_index.json
----- roads.geojson
----- runways_taxiways.geojson
----- config.json
----- XXX.pmtiles
Now, we should have a total of 6 files (the 5 mentioned above and the config.json we just created). It's time to package them into ZIP format to be able to distribute our map to users.
Open a terminal and navigate to the directory in which all 6 files are located. Install the zip package if you haven't already. You can do so by running:
sudo apt install zip
This will let us create a ZIP file from the command line. Run the following command (replace MAP_NAME.zip and XXX.pmtiles accordingly):
zip MAP_NAME.zip demand_data.json buildings_index.json roads.geojson runways_taxiways.geojson XXX.pmtiles config.json
If you'd like, you can manually make the ZIP any way you'd like. However, ensure that your files are in the root of the ZIP, not nested inside of a subfolder. The correct format should be:
- MAP_NAME.zip
--- demand_data.json
--- building_index.json
--- roads.geojson
--- runways_taxiways.geojson
--- config.json
--- XXX.pmtiles
and NOT:
- MAP_NAME.zip
--- subfolder
----- demand_data.json
----- building_index.json
----- roads.geojson
----- runways_taxiways.geojson
----- config.json
----- XXX.pmtiles
Step 6 - Testing and Distributing your Map
Once you have the ZIP, your map is done! The only thing left to do is test it out and distribute it to users. Import your map into the game using the Map Manager (you can follow the map installation guide if needed). Test your map in game to verify that it loads and that the demand data looks good. If it is not, you can adjust your Demand Data Generator parameters and generate the data again. Be sure to note in your release the quality of the data, whether it's very good, good, OK, acceptable, or bad.
To share your file, upload it to a file sharing service like Google Drive or Mediafire. Copy the share link (make sure it's visible/public).
Since GitHub has file size limits, it is not recommended to upload map to GitHub. You can use GitHub safely if your map's ZIP file is under 100 MB. It is strongly encouraged not to use GitHub LFS.
On the wiki's issues page, you can open an issue with the prefix [New Map] followed by the name of your map. Include a link to the download of your map, as well as the population for your map to be displayed on the wiki. Additionally, you can post the map in the #map-sharing channel of the Subway Builder Discord.
After this, you should be done! If you have any issues or questions with either the Demand Data Generator or the Map Patcher, you can send a message in the #mod-support channel in the Subway Builder Discord for additional assistance.